Updated
7 Minutes, 57 Seconds to Read
Setting up an Email Account with Apple Mail (Mavericks version)

Step 1. Open the Apple Mail client.
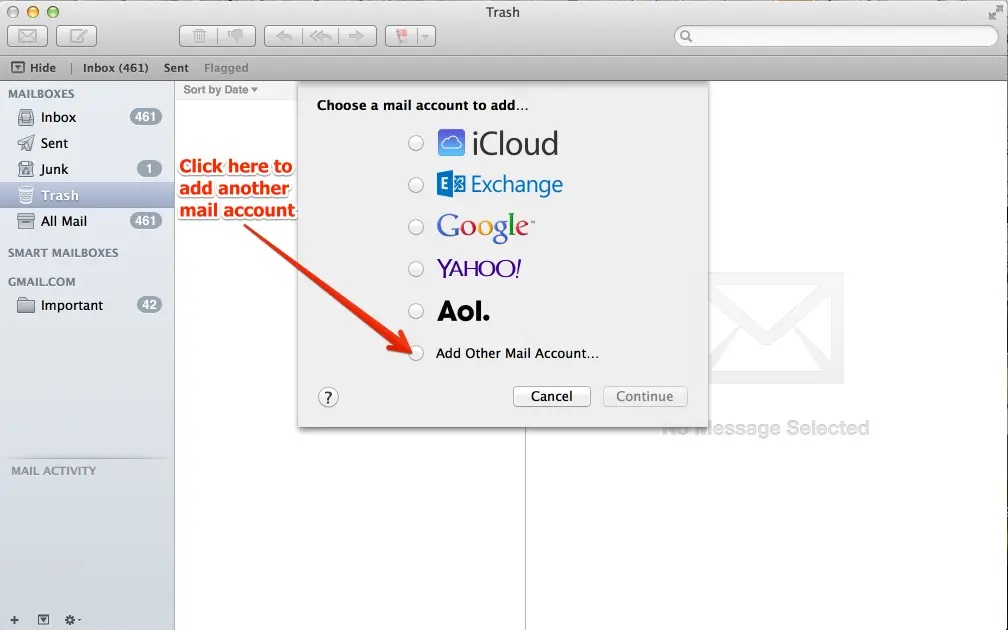
Step 2. There are a few different ways to open a new account. In the menu bar for Mail, scroll down and click on Add Account.

You can also click on Accounts and then you will see a window labeled Internet Accounts with a list of email account types listed at the right starting with iCloud. Scroll to the bottom of that list and then select Add Other Account. If you’re not using a mouse, but you have a trackpad, you can scroll up or down the list by placing the mouse pointer over the list, then use two fingers simultaneously and stroke the pad either up or down.

In the same Internet Accounts screen, you can click on any existing account in the left-hand column, then click on the plus sign in the bottom left hand corner to make the list appear for the account types at right. Scroll down, and click on Add Other Account to start the account addition process.
Step 3. Depending on the method you used above, you will see one of two screens to add an email account. If you selected Add Account from the Mail menu list, then click on Add Other Mail Account, then the click on Continue.
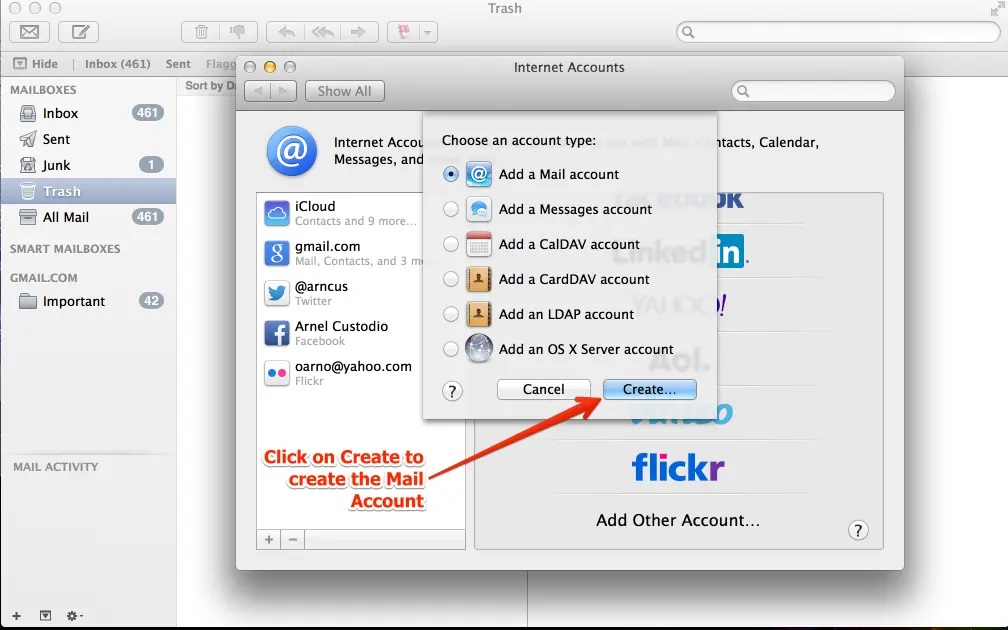
If you used either of the other methods, click on Add Other Account at the bottom of the email account types. You will then see another list of account types. By default, it is set to “Add a Mail account”. Leave this option selected and click on the Create button to continue.
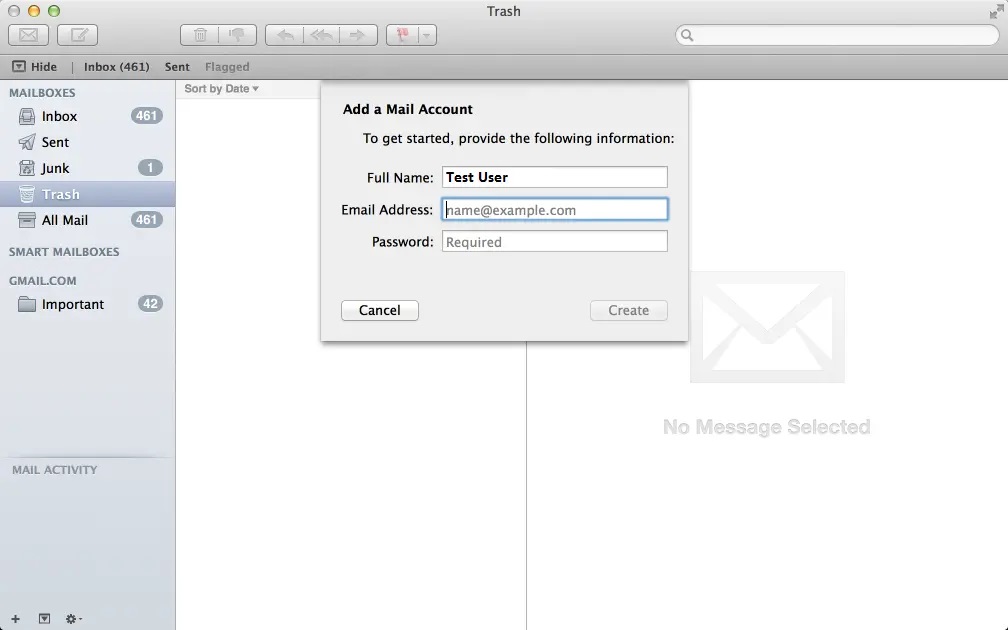
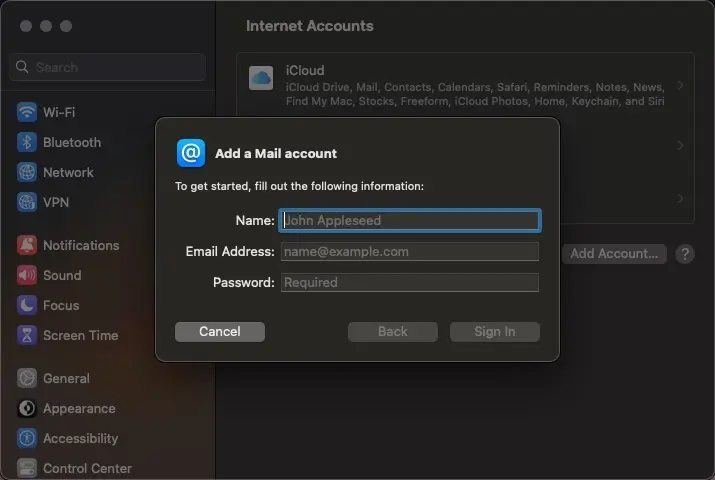
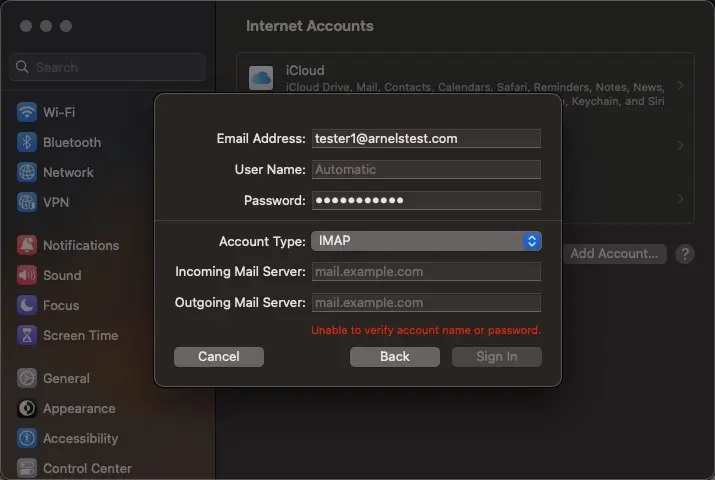
Step 4. You will see a window labeled Add a Mail Account that allows you to add the full name, email address and password for the account you’re setting up. Fill in the fields then click on CREATE to continue. Apple Mail will then attempt to auto-create the account. If it cannot create the account automatically, then you will see a message appear stating “Account must be manually configured.” Click on Next in order to get to the next step.
Step 5. In the Incoming Mail Server info window, select the account protocol that you wish to use: IMAP or POP.

Step 6.Click in the Mail Server field and type in the setting for your mail server. If you need help with this field, please review the tutorial on finding your email settings.
Step 7. Fill in your User Name and your Password for the email account. This was set when you created the email account in cPanel. The User Name must be an email address. For example: someone@example.com. You can also find documentation on changing your email password if you have forgotten it or if it needs to be updated.
Step 8. Click on Next. Apple Mail will try to verify the password before continuing. If it is unable to verify the password, then it will give you a message: “Additional account information required”. Once the password is verified, it will jump to the next screen.
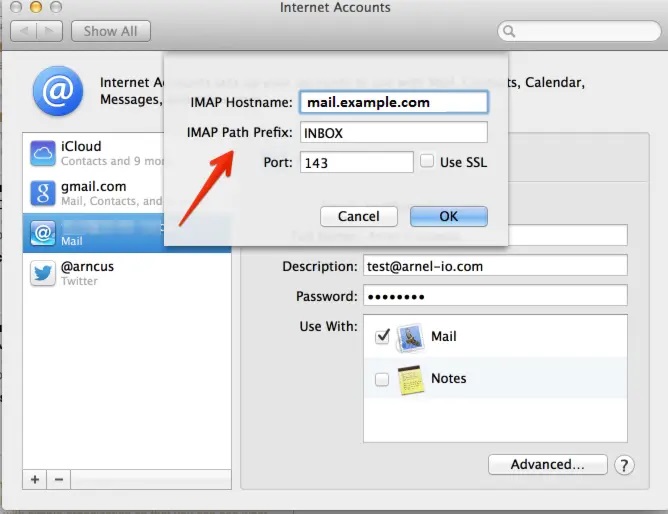
Step 9. The Incoming Mail Server Info screen starts off with the Path Prefix. As per the screenshot, set this to “INBOX“. Port settings depend upon the protocol you have chosen. The Authentication password is the same as the email account password. Click Next to continue.
You may or may not see a Verify Certificate window. It depends on whether you have approved the certificate in the past.It will state the following: The identity of “mail.example.com” cannot be verified. Click on Connect to verify the certificate. This prompt will only appear if you have not approved the certificate to connect with the server in the past or if it was updated. See Problems with Verifying the Server below.
Step 10. You will next see the Outgoing Mail Server Info screen. The SMTP server settings are the same as the Outgoing Server settings that can be found in the How to find your email settings article. The User Name is the same as the user name in the Incoming server section name – it is the email account name in full. For example: someone@example.com. The next field is for the password of the email account. Type it in, then click on Create to proceed.
Step 11. This screen will show the Port, SSL and Authentication options for the Outgoing mail server. The port number for the Outgoing mail server is either 25, 587 (non-SSL), or 465 (SSL). The following table summarizes the settings:
| Port setting | Description |
|---|---|
| AUTO | Lets the computer choose the port to be used. Not recommended as the computer may sometimes “hunt” for the port. |
| 25 | This is the default outgoing port, but may be blocked by the internet provider for spam prevention. |
| 587 | This is the recommended outgoing port. |
| 465 | This is the port used for SSL settings. You will need to click on the checkbox that says “Use SSL”. |
Problems With Verifying the Identity of the Server During Setup
If you continually see the Approve Certificate window appear, ensure that the certificate matches the entry you used for the incoming mail server (above). If it does not match, then click on Cancel or Show certificate. The Show certificate option will allow you to see the certificate’s details. Make sure that it matches the server you’re trying to connect to. If it does not, and you’re confused about this detail, then contact the technical support department so that they can review the information and make sure it’s correct.
Setting Up an Email Account with Apple Mail (Ventura version)
With the latest versions of the Apple OS, the steps for setting up the Apple Mail email client have changed.
Step 1.Open the Apple Mail client.
Step 2.Click on Mail in the menu bar at the top of the screen.
Step 3.Click on Accounts.

Step 4.Click on Add Account. You will see a list of types you can select.
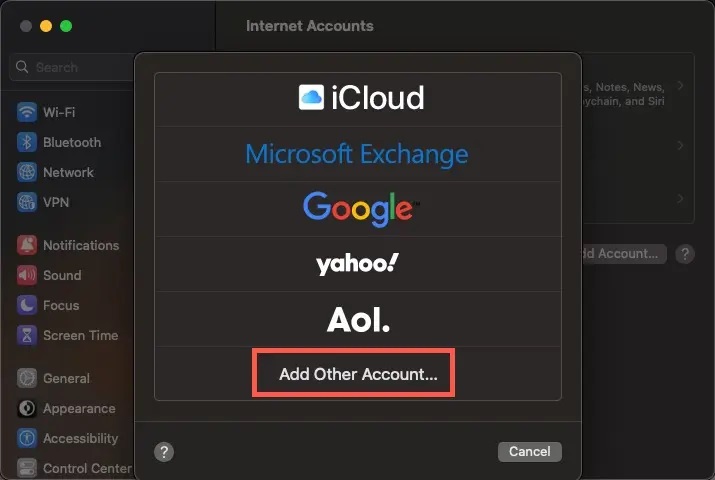
Step 5.Click on Add Other Account.
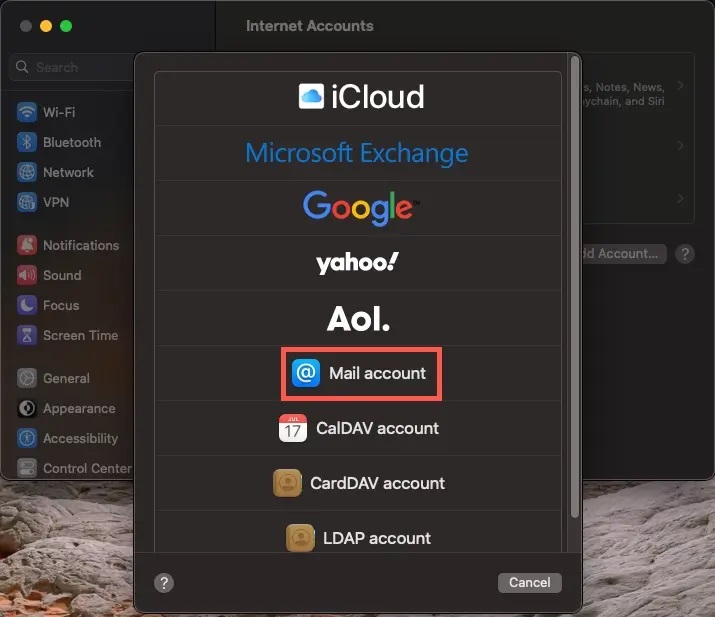
Step 6.You will see another list. Click on Mail account.
Step 7.Type in the mail account information that you are using for the setup.
Step 8. At this point, Apple mail will try to verify the account. If it fails, then you will be able to add more information about the email server. This includes the mail server information.
Once the account is confirmed, the email client can display, read, and compose emails from the account.
Troubleshooting the Email Server Connection
At this point, the Apple Mail client will connect and load up the mail in the account. You will see the new mail account appear under the Inbox icon. If you continue to have account creation problems, try changing the settings to use the SSL settings as indicated in the email settings article. If the problem persists after trying those settings, please contact our live technical support team via phone/chat/email for immediate assistance.

Error Message: “Could Not Be Moved to the Mailbox”
This error may occur when moving your email account from one host to another. This is basically a sync issue with Apple Mail that can be corrected in a few different ways. One user reported having to delete the account in Apple Mail and re-add it. Other community users have reported the following:
Shutting Off Mail and Re-enabling Mail App
Step 1.In Settings, click on Mail > Accounts> [Account Name] > shut off “mail.” NOTE: This option is not available in the newest versions of Apple Mail. You would have to uncheck “Enable this account” to disable the account.
Step 2.Force quit Apple Mail.
Step 3.Open the Mail app and check that there is no mail for the account.
Step 4.Force quit the Mail app again.
Step 5.Open Mail.
Step 6.Go to Settings and re-enable the account.
The account should then re-sync without the error.
Rebuild Mail Account
If you have the latest version of the Mac OS, then this option may work better, as Apple Mail includes a new option for rebuilding the account.
Step 1.Uncheck “Enable this account” in Mail > Settings > Account Information.
Step 2.Force quit Apple Mail.
Step 3.Re-open the Mail app.
Step 4.Go to Settings and re-enable the account.
Step 5.Close the Accounts window.
Step 6.Select the Mail account (if you have more than one).
Step 7.In the Apple Mail menu, go to Mailbox > Rebuild.
This should rebuild the account and fix the error. If either of these methods still result in the error, remove and re-add the account before re-syncing or rebuilding the account.
You should now be able to setup Apple Mail in either the older or newer versions of Mac OS. We have also reviewed how to troubleshoot email server connections and solutions for the “could not be moved to Mailbox” error.
