How to Set Up the cPanel DAV Daemon
4 Minutes, 0 Seconds to Read

The cPanel DAV Daemon enables a set of extensions that allow users to manage website data remotely. For example, CalDAV is an extension that allows multiple devices to access and manage calendar data on a remote server simultaneously. With CalDAV, you can create, share, edit, and remove calendar events using your server to host them. The following guide outlines the steps to set up cPanel DAV Daemon and add CalDAV services.
NOTE: The steps below require Root Access, which is only obtainable on VPS and Dedicated Servers.
Enable cPanel DAV Daemon
To use CalDAV, the cPanel DAV Daemon must be enabled in WHM. Follow the steps below to allow the cPanel DAV Daemon.

Open Ports in Firewall
The cPanel DAV Daemon uses the firewall ports 2079 and 2080 to manage connections. Generally, these ports are not “open” to making connections by default. Opening ports in the firewall for connections is similar and straightforward, whether you are using APF or CSF. The instructions in this section will describe how to determine which firewall is running. Depending on whether you are running APF or CSF, follow the respective instructions to learn how to open the necessary ports for the cPanel DAV Daemon.
Which Firewall Am I Using?
If you are using the default configuration of a VPS or Dedicated Server, then you most likely are running APF. To confirm this, run the following command as root:
/bin/systemctl status apf.service
/bin/systemctl status apf.serviceThe output below confirms that APF is active:
root@hostname
 ~ $  /bin/systemctl status apf.service ● apf.service - SYSV: Advanced
Policy Firewall Loaded: loaded (/etc/rc.d/init.d/apf; bad; vendor
preset: disabled) Active: active (exited) since Wed 2017-10-04 17:51:10
EDT; 2min 37s ago Docs: man:systemd-sysv-generator(8) Process: 20628
ExecStart=/etc/rc.d/init.d/apf start (code=exited, status=0/SUCCESS)
root@hostname ~ $ /bin/systemctl status apf.service ● apf.service - SYSV: Advanced Policy Firewall Loaded: loaded (/etc/rc.d/init.d/apf; bad; vendor preset: disabled) Active: active (exited) since Wed 2017-10-04 17:51:10 EDT; 2min 37s ago Docs: man:systemd-sysv-generator(8) Process: 20628 ExecStart=/etc/rc.d/init.d/apf start (code=exited, status=0/SUCCESS)The output below indicates that APF is not active:
root@hostname ~ $ /bin/systemctl status apf.service Unit apf.service could not be found.
root@hostname ~ $ /bin/systemctl status apf.service Unit apf.service could not be found.In this case, run the following command as root:
/bin/systemctl status csf.service
/bin/systemctl status csf.serviceThe following output confirms that CSF is running:
root@hostname
 ~ $  /bin/systemctl status apf.service ● csf.service - ConfigServer
Firewall & Security - csf Loaded: loaded
(/usr/lib/systemd/system/csf.service; enabled; vendor preset: disabled)
Active: active (exited) since Wed 2017-09-20 13:58:36 EDT; 2 weeks 0
days ago Main PID: 829 (code=exited, status=0/SUCCESS) CGroup:
/system.slice/csf.service
root@hostname ~ $ /bin/systemctl status apf.service ● csf.service - ConfigServer Firewall & Security - csf Loaded: loaded (/usr/lib/systemd/system/csf.service; enabled; vendor preset: disabled) Active: active (exited) since Wed 2017-09-20 13:58:36 EDT; 2 weeks 0 days ago Main PID: 829 (code=exited, status=0/SUCCESS) CGroup: /system.slice/csf.serviceOpening Ports Using APF
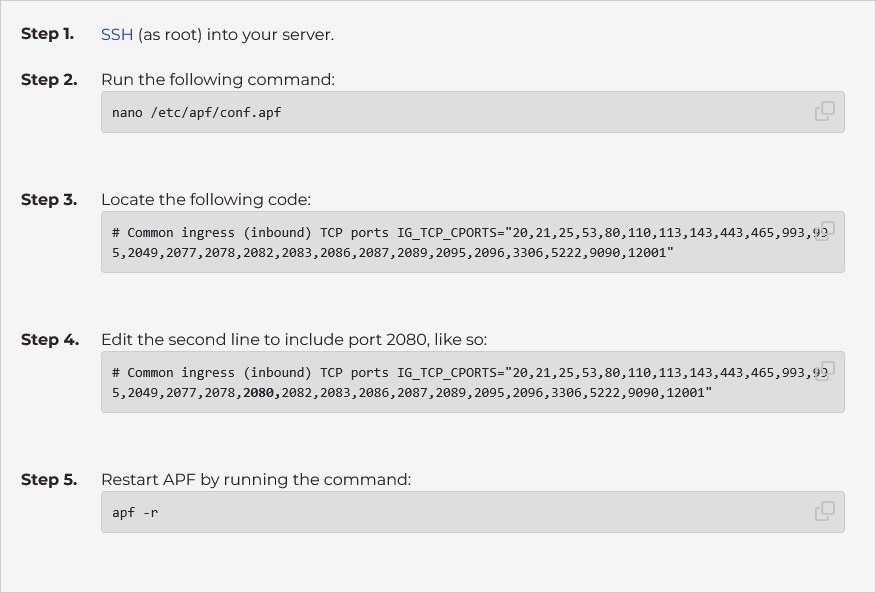
Port 2079 is insecure and could expose your server to security risks. We strongly recommend that you use port 2080 instead.
Opening Ports Using CSF

Testing
Once you have enabled the cPanel DAV Daemon and opened the port in the firewall, you can use telnet to test the connection to port 2080 by running the following command:
telnet server.hostname 2080
telnet server.hostname 2080You should receive the following output:
telnet server.hostname 2080 Connected to server.hostname. Escape character is '^]'.
telnet server.hostname 2080 Connected to server.hostname. Escape character is '^]'.Now that you have opened the ports and enabled the cPanel DAV Daemon, CalDAV is available. You can now sync calendar data for your domain using this protocol.
